|
Click pictures for a larger version.

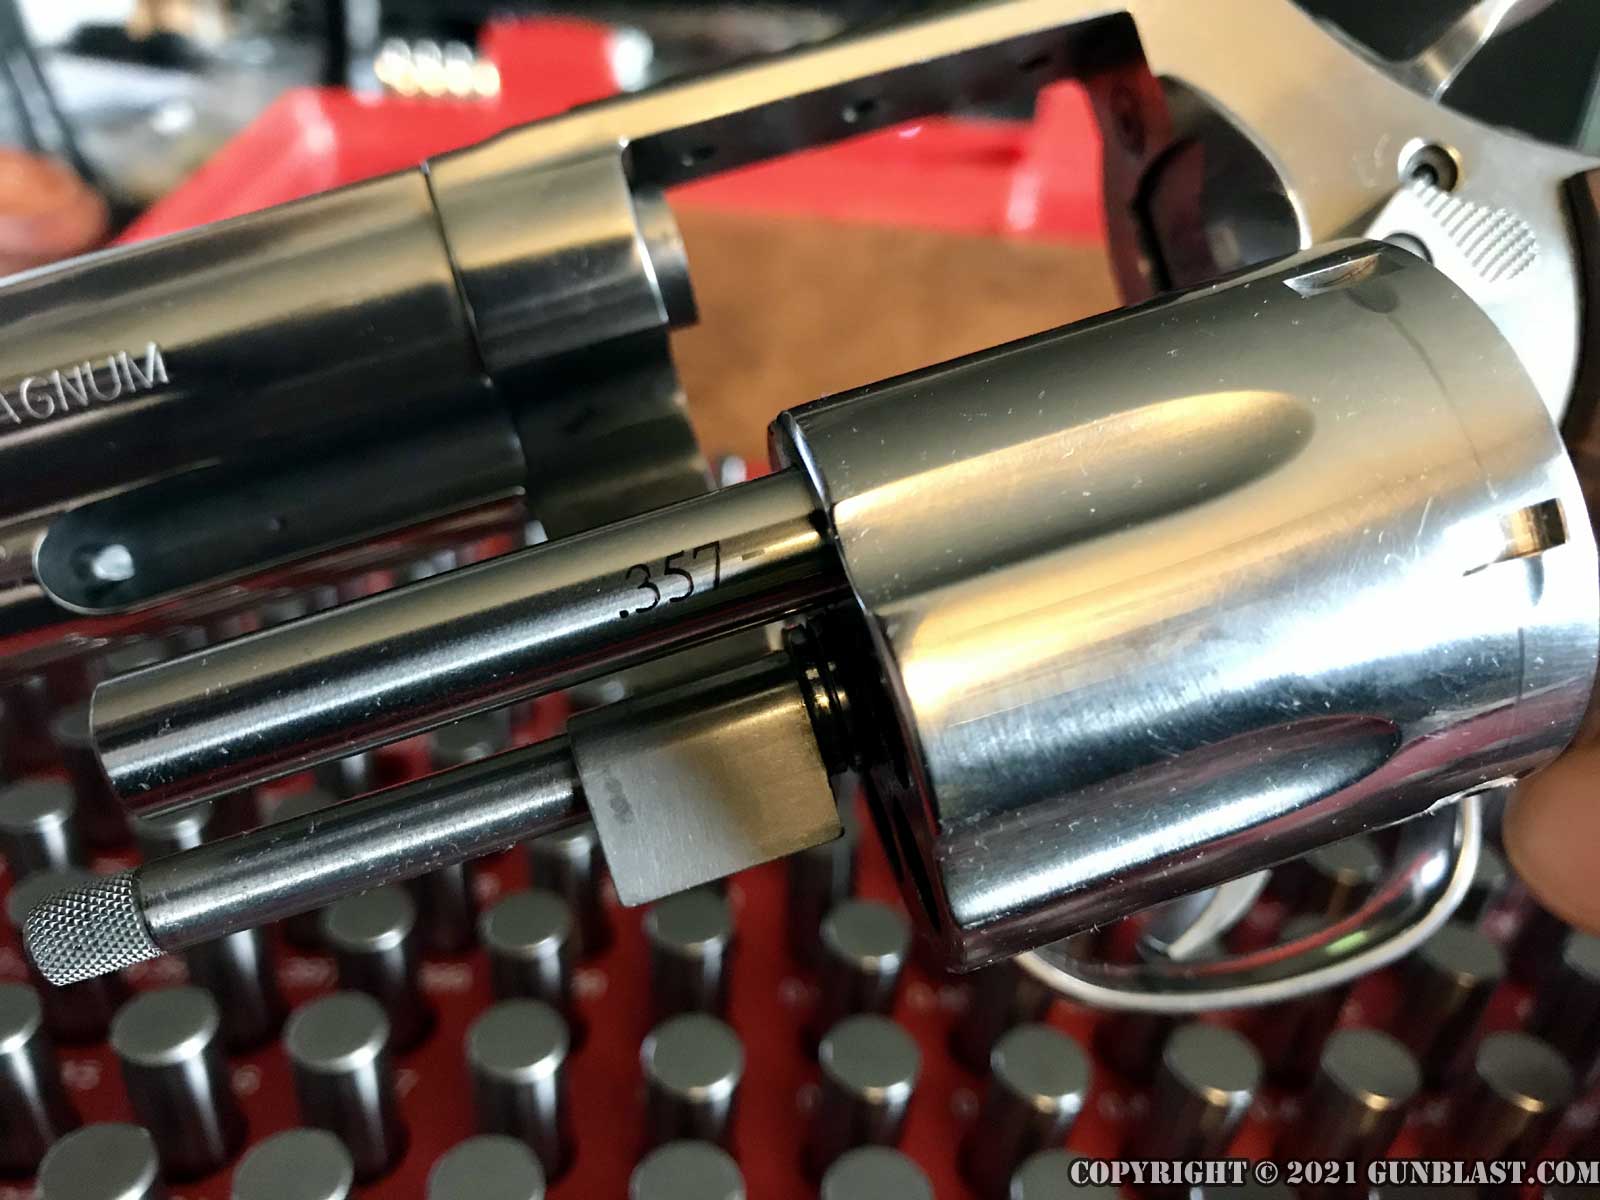
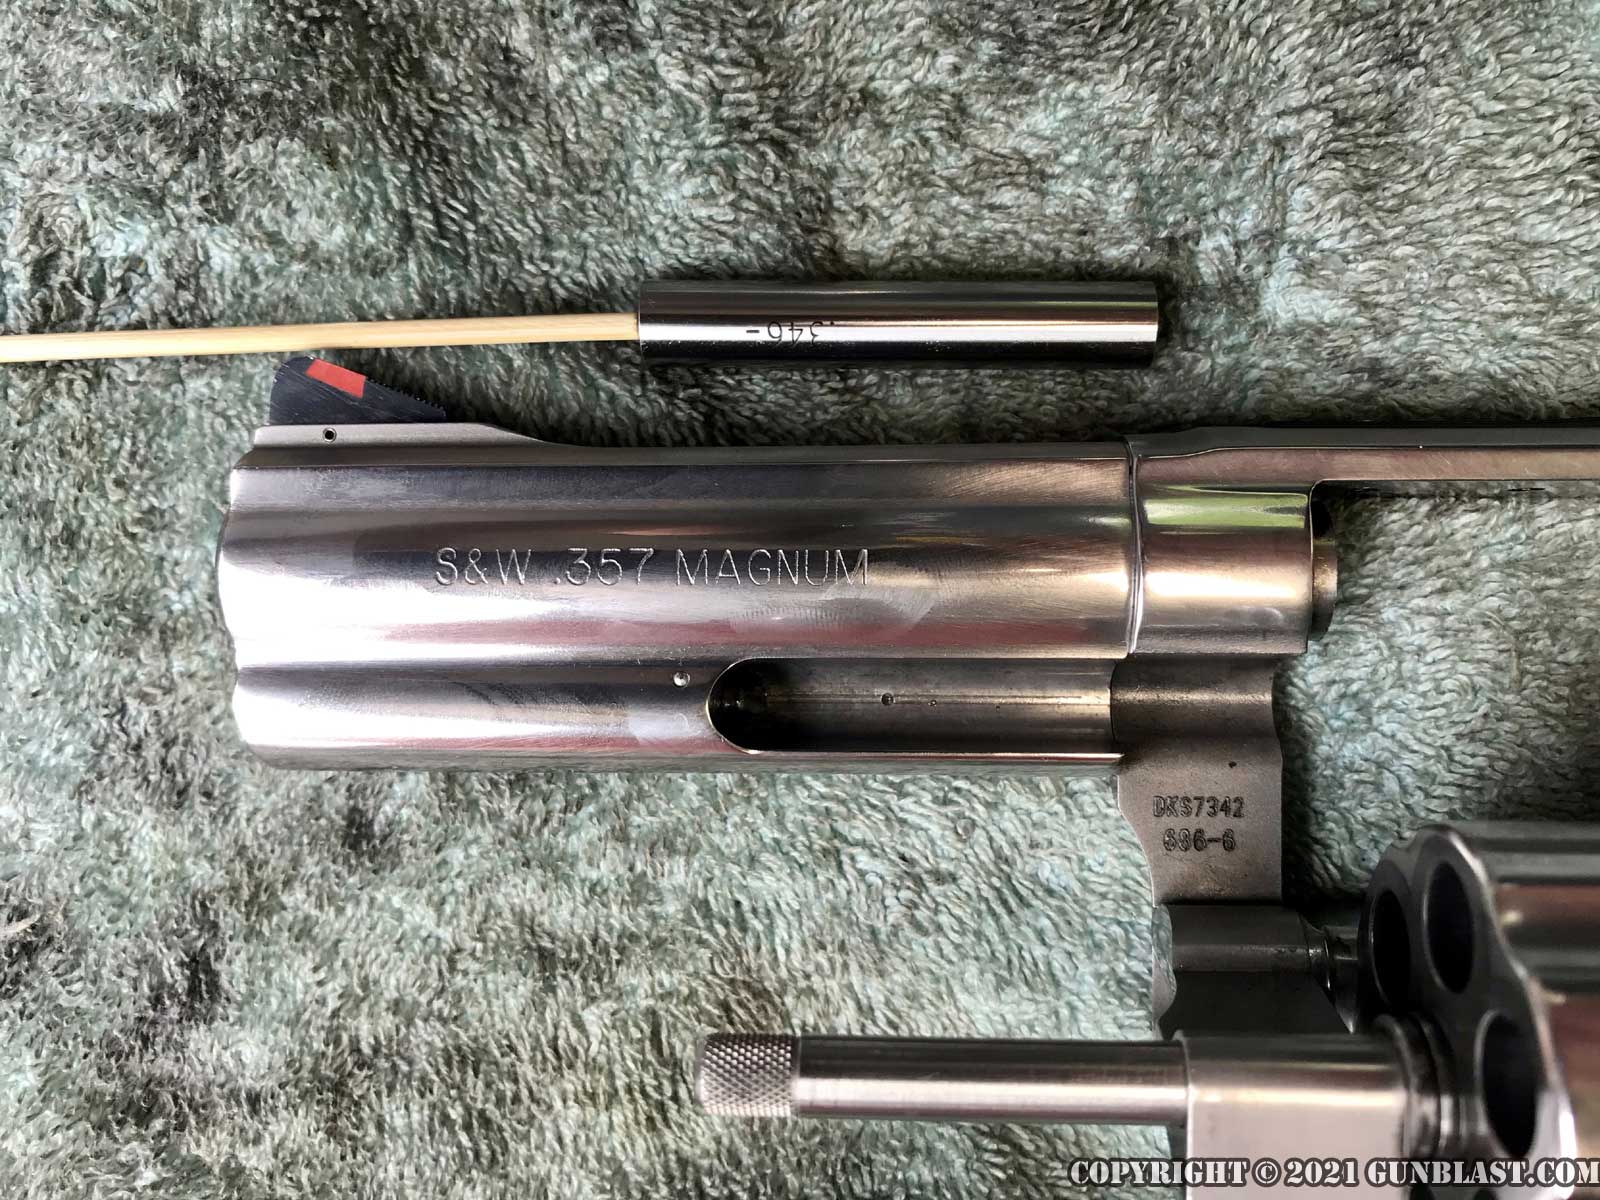
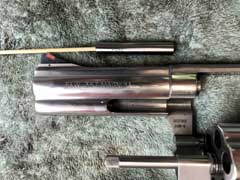
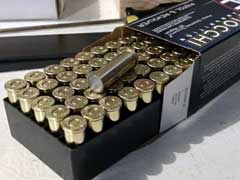
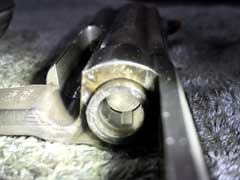
Smith & Wesson Model 686-6.
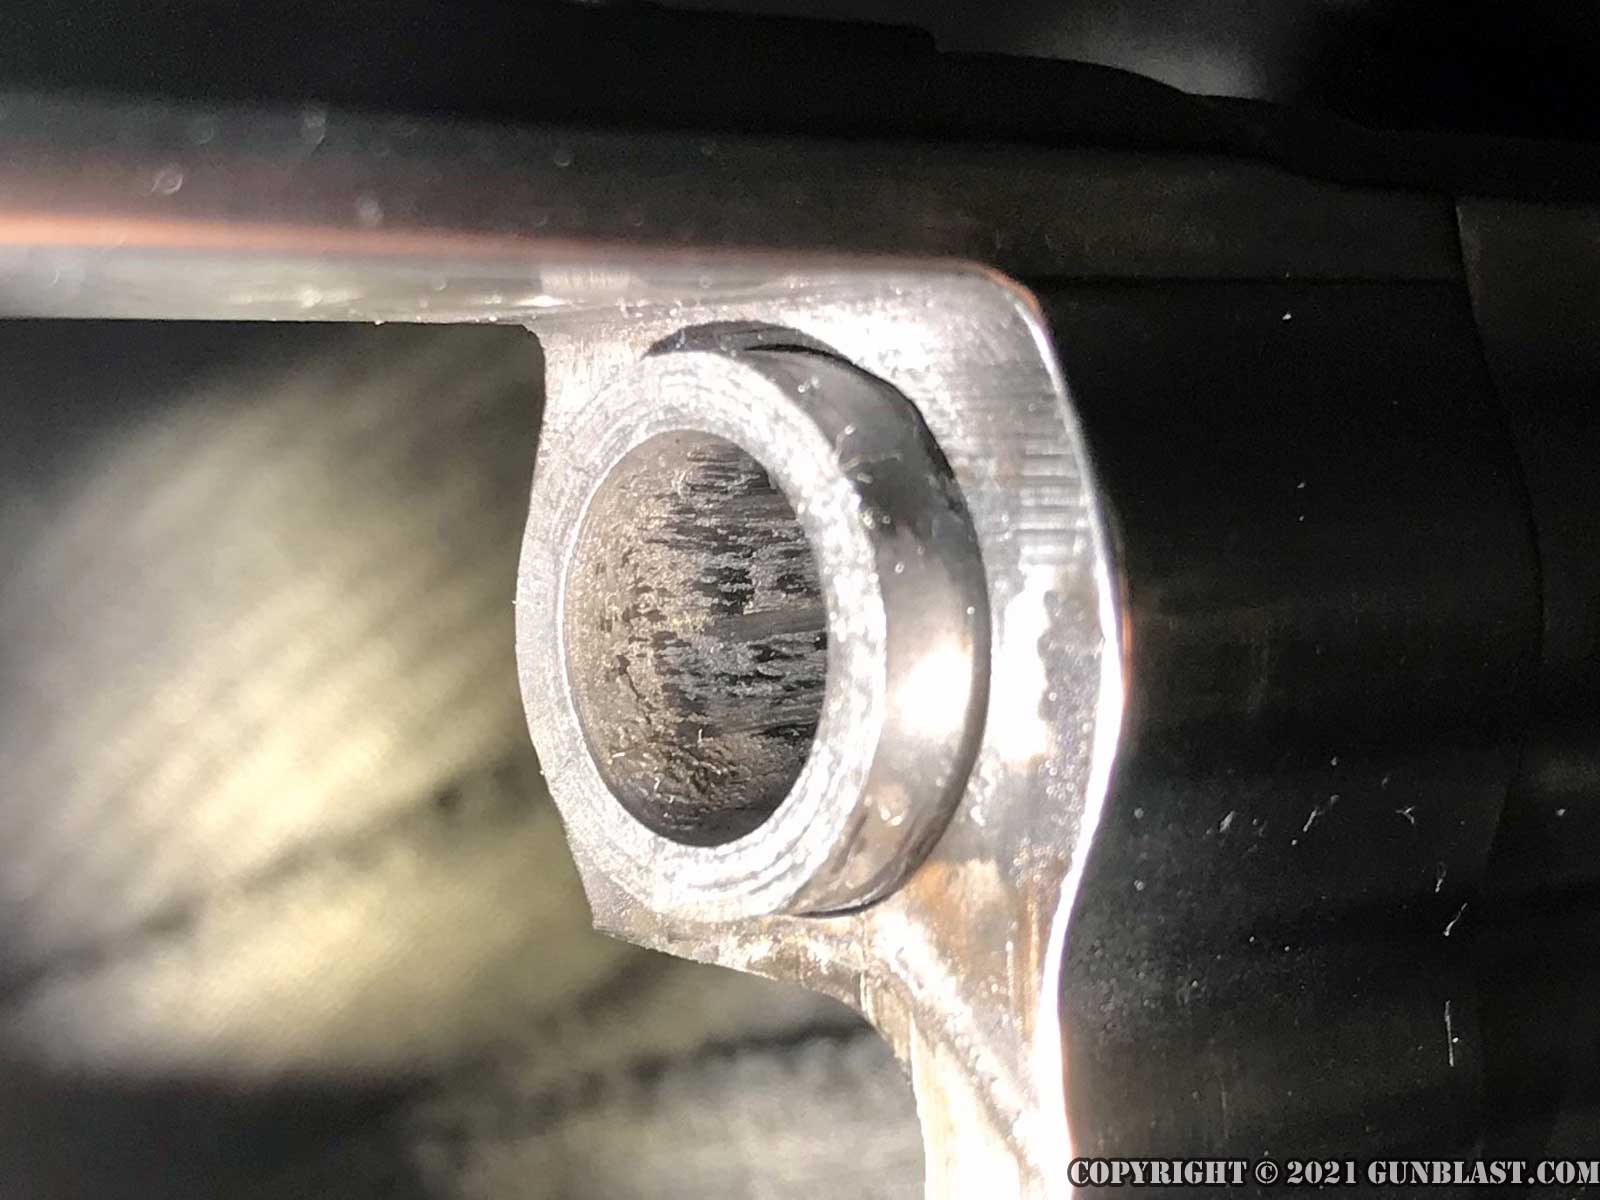
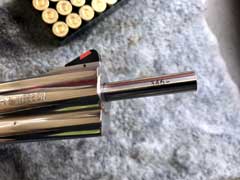
Severe leading in the forcing cone is evident.

Cylinder throats measured a perfect and consistent .357
inch.
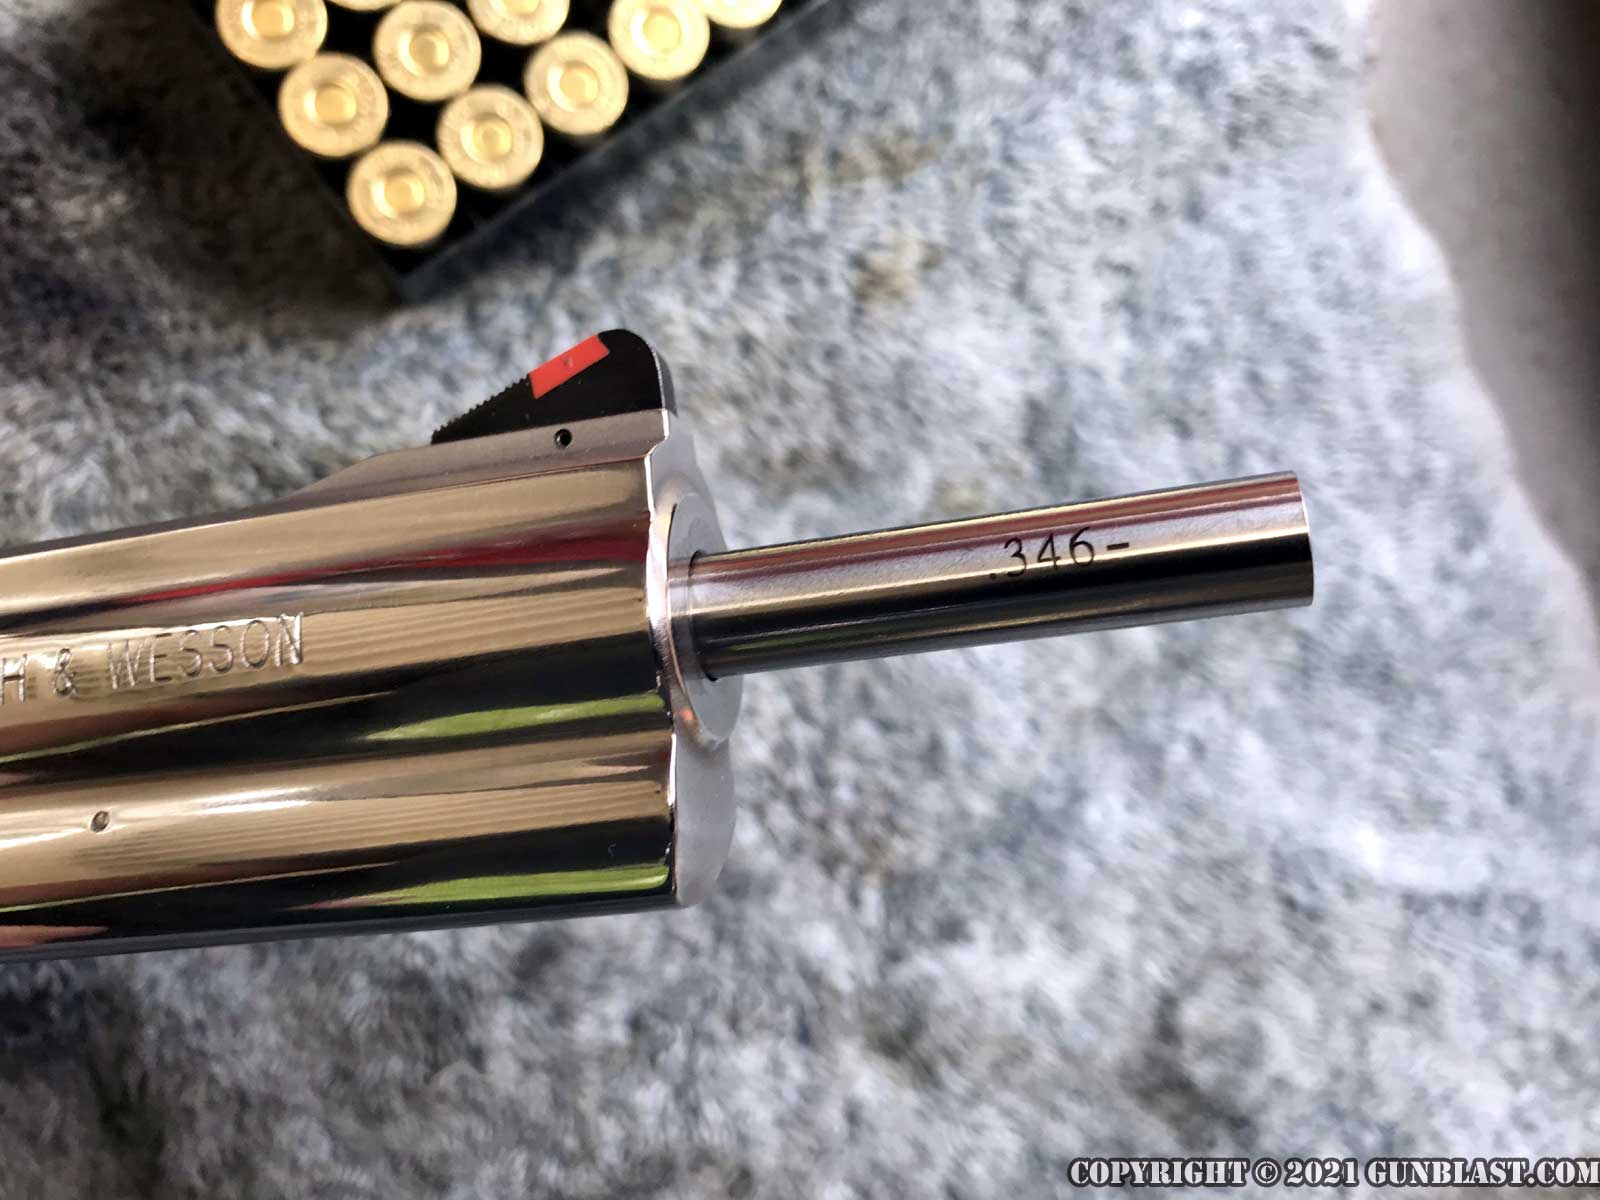
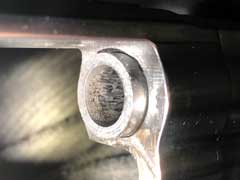
.346 pin gauge entered only partway into the barrel,
indicating a constriction.
|
|
Hi folks, I'll be providing this write up in hopes that it will help some of you who have found yourselves in the same predicament as me - with an inaccurate revolver that is constantly leading the barrel. The processes for fire lapping, leading issues and bullet selections have been described in great detail by fellow sixgunners who have been in the game far longer than myself, however I will tie in my own experiences into using their techniques to solve my own revolver issues. Keep a couple points in mind, THESE ARE NOT UNCOMMON ISSUES IN REVOLVERS and with a little know how you will be more than capable of making your sixgun a problem free, accurate shooter that will even surprise you.
So on to the case study and the problem revolver - a Smith and Wesson Model 686-6. The good ol stainless steel Distinguished Combat Magnum holding a standard 6 rounds of 357 magnum or 38 specials. Like my grandfather before me who religiously carried a 1955 S&W K-38 Combat Masterpiece, I wanted my own personalized sixgun to pass down to my kin. But this thing needed to be MY gun! So on went a set of custom Herrett's Jordan Trooper stocks, lightened the springs, added a target hammer for my club of a thumb, polished the stainless steel and ordered a fancy floral carved 1930 Austin holster from El Paso Saddlery. That should do it, now on to shoot it at the range. Did it shoot as accurate as Clint Eastwood in a dual at Sad Hill Cemetery? NOPE. Not even close. At 25 yards it was all over the board and looked more like a shotgun pattern than a group. Then I got home and guess what I found in the barrel? It looked like a sewer pipe packed full of lead. All of the fancy stocks and
add-ons will be for nothing if the gun won't shoot worth a hoot. If this was going to be one of my lifelong
sidearms, I needed to figure out how to solve the lackluster accuracy and how I am getting that much leading down the barrel.
Turns out some 10 years or so ago, a gentleman by the name of Fermin Garza had done a very well put together
write up right here on Gunblast regarding the same issues I was seeing. In his words the issues could be created by three different parts of the overall revolver equation:
1.) Bullet selection (and lets just add in your reloading techniques here as well)
2.) Cylinder throat dimensions
3.) Barrel dimensions
For my sixgun, it really ended up being #1 and #3 driving the issues, but in your own cases it may be one or all of them. Let's take a look at how I checked my own 686 and you can apply the process to your own situation. First, the most important tool to get your hands on is a set of minus sized pin gauges. My set came straight off of Amazon for around $100 and came with a total of 250 different sized pins ranging from .251 to .500. You can always pool your money with a few buddies that all share the same hobby or see if your gun club doesn't already have a set or would be willing to pick up a set for club use (never hurts to ask!). I myself have a few revolvers to use them with so the cost is pretty well worth having the tools on hand.
First thing to check are the cylinder throats. The 686 is a .357 magnum revolver, so I started a few pin sizes below that at .354 and pushed them through each chamber just as I would loading the cylinder with ammo. I did this process to each chamber and worked my way up until I got to the largest size pin that would fit freely in each of the 6 cylinder throats. That largest pin size will help me determine the diameter bullet that will work with my revolver and if I have uniform cylinder throats or if I will need to have them reamed out in order to be uniform. Turns out, my 686 had very uniform .357 throats in all six chambers. PERFECT!
It doesn't always work out that way though. As an example, my 44 Special Ruger Bisley Blackhawk sported oversized .432 cylinder throats. They were still quite uniform, but I definitely could not use the standard .429 or .430 sized bullets or I should expect the hot gasses blasting between the cylinder throat wall and the skinny bullet to spray melted lead on to the frame and forcing cone of my Blackhawk. Been there, done that.. not much fun to scrub up. The solution for the 44 Bisley was speaking with another sixgunner, Dick Thompson, who suggested GT bullets in Georgia to make me a batch of .432 sized 255 grain Keith bullets. They worked great, fit the cylinder throats perfectly and helped solve my leading issues on that sixgun. By far the worst of the guns in my stable turned out to be a 2013 Colt SAA. For a gun that should shoot about a .452 bullet it had cylinder throat sizes all over the place including one measuring a .459 throat! Forget reaming, I could literally could shove a 45-70 bullet through that chamber! A cylinder that variable and oversized means either a new cylinder or sticking to FMJ ammo from there on out... that sixgun is on the back burner till I figure out what to do with it. I digressed a bit, so the 686 has a great set of .357 cylinder throats and now I know my bullets need to be sized to ~.3575 or up to .001 oversized (.358) to maintain accuracy and eliminate leading from gas blow by.
Now on to pin gauge the barrel. In a perfect world, your barrel should taper from the forcing cone all the way to the muzzle of the barrel. This means when I can fit a pin into the muzzle end of the 686, it should be able to slide all the way to where the cylinder is seated with no stoppages along the way. Stoppages mean a constriction in the barrel and a loss of accuracy because the bullet has to squeeze past the tight spot and will not bounce back to its original size on the other side. Thus once a bullet is squeezed past the constriction, hot gasses can escape past your bullet causing leading and the bullet is no longer efficiently engaging the rifling so you end up with lousy accuracy. Keeping all of this in mind, I started at a .340 pin and ended up working my way to a .346 pin. The .346 pin went in about a half inch into the muzzle before it snugged up and stopped. There you go, it has a barrel constriction, that far up the barrel though what could cause that? Burrs in the rifling can, also the way S&W stamps the logo and caliber on the barrel has the potential to constrict the barrel dimensions. Either way I now know I need to fire lap the barrel to remove this constriction.
Last piece of the equation was my bullet selection and reloading techniques. I have been around firearms since I was a kid but reloading is a relatively new process for me. Just as no one revolver is the same as another, bullets are no different! Bullets vary in grain weight, diameter and one I didn't understand how important it was till now was hardness of the lead. I know from the measurements we just walked through that bullet diameter I needed for the 686 should be between ~.3575 to .358, and here is where a true micrometer will come in handy to measure bullet specs. By 'true' micrometer, we aren't talking the $15 electronic calipers from harbor freight that go to the thousandths (.000). I'm talking a decent C clamp looking micrometer that goes
at least to the ten thousandths (.0000). Mine came from Amazon and was made by Mitutoyo (model 293-340-30 for reference). Thing is, I checked the Barry's 125 grain flat nose lead bullets I had been using and the 10 bullet average size ran .35785 and was within the tolerance I needed... so why the leading? Remember me talking about bullet hardness?
I need to talk about this a bit, but for more in-depth information I would search for Grant Cunningham's write up on "Preventing barrel leading in revolvers using cast bullets". Common Lead hardness can go from pure lead at 6 BHN (Brinell hardness number) all the way to 30 BHN for some of the hardest lead alloys. Hardness is important because you want your bullet to achieve obturation or expand fully to the diameter of your cylinder throat, then squeeze into the forcing cone and continue squeezing down till it exits the end of your muzzle. No gaps between the bullet and the rifling surface. If this is not achieved you will get gas blow by and you guessed it, leading! So how do we achieve obturation? By providing enough pressure behind the bullet to cause it to expand and seal off the gasses. The harder BHN the bullet is the more pressure (measured in CUPs or Copper Unit of Pressure) is needed to expand the bullet. But too much pressure behind too soft of a bullet will melt the lead off into the barrel via high levels of friction and get you leading as well; I needed to find a happy middle ground. Luckily as Grant touched upon in his writings, there is a rough calculation I can use to make quality ammunition for the 686:
Ideal hardness in BHN = Pressure (CUP)/1,920.
There was one of my problems! I was making light loads for the 686 to use for plinking at the range and was using 4 grains of W231 powder behind my Barry's bullet... with a whopping 20 BHN in hardness. Using the equation, I should have been using a 6.25 BHN soft lead cowboy bullet at that pressure level (which was about 12,000 CUP). With a 20 BHN bullet my pressure level should be in the range of 38,400 CUP! I was off by 26,400 CUP, no fire lapping or magic in the world would have stopped me from leading the barrel with ammunition loaded up like that. No obturation was going to occur, gasses were going to blow by and leading was going to start right from the time the bullet launched into the barrel. Knowing all of this, my new loads for the 686 are the Barry's 20 BHN bullets with 8.7 grains of unique behind it to achieve the 38,400 CUP pressure level.
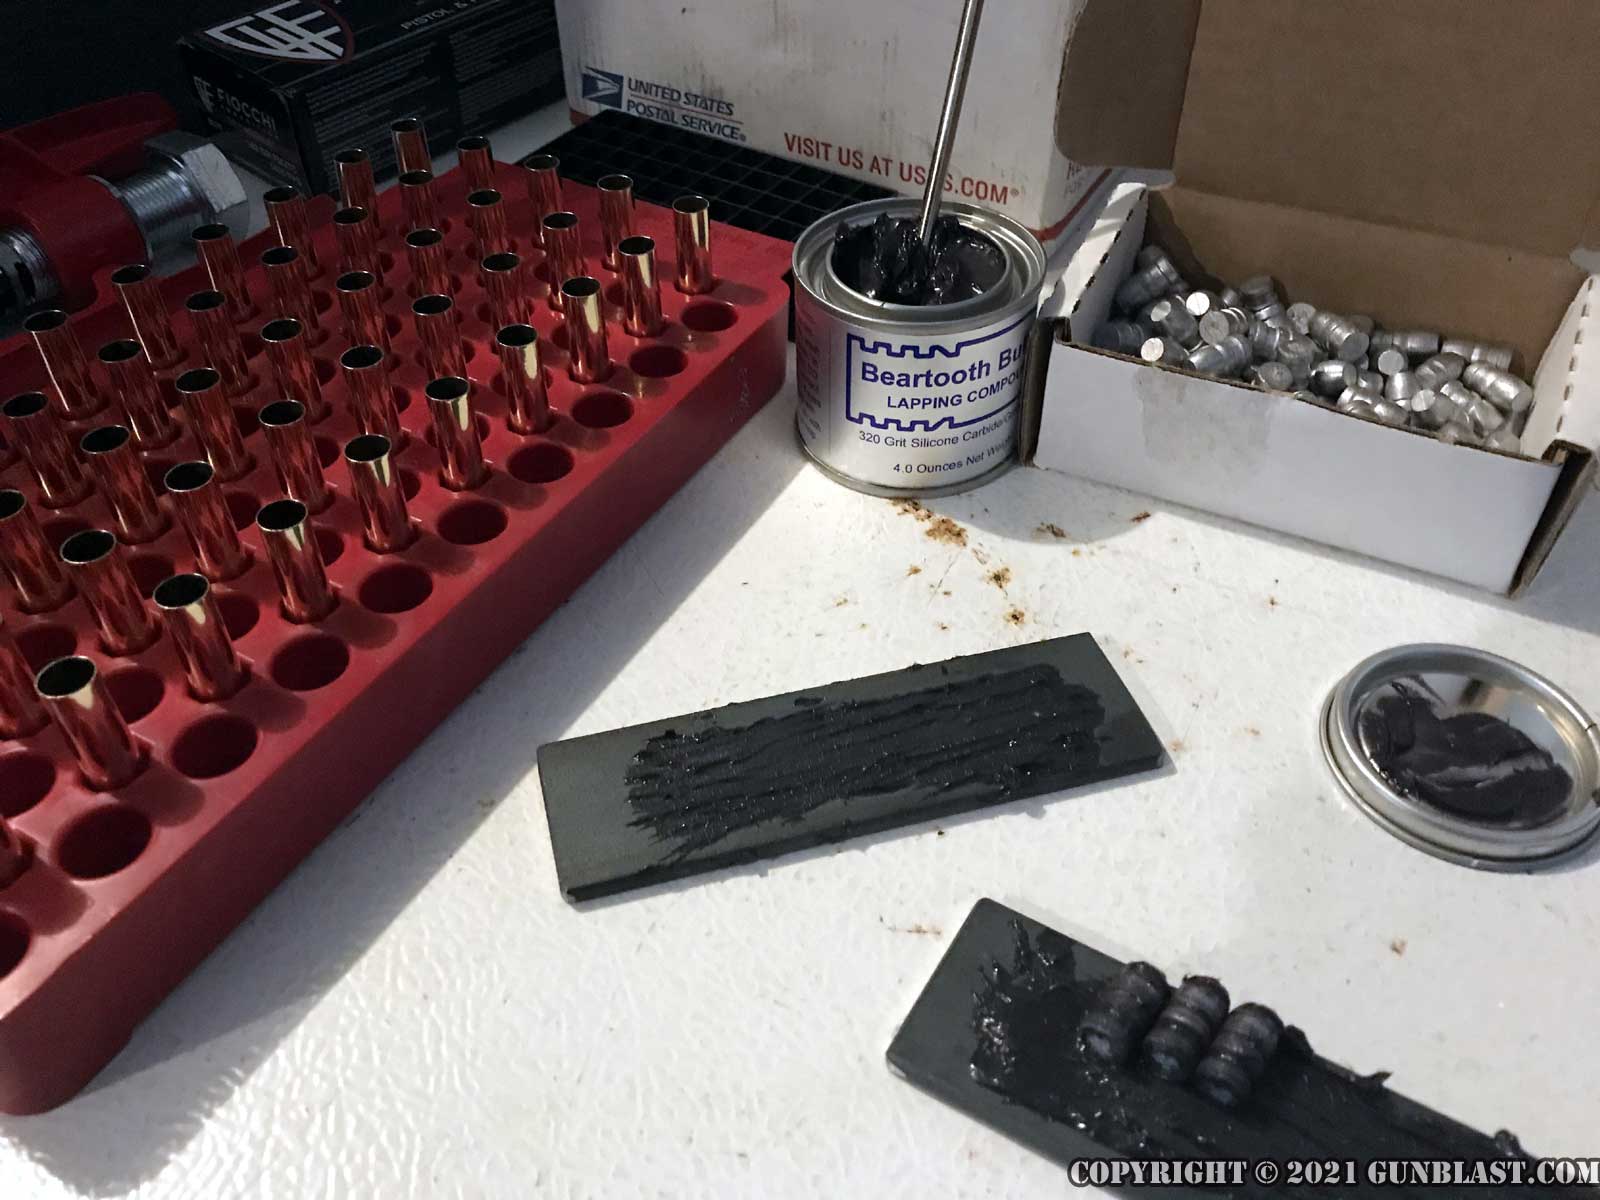
Ok so we now know that the cylinder throats are good, my ammunition is (now) good, and I need to fire lap the barrel. I won't touch too much on the process for making the lapping bullets,
I would look to Fermin's write up as it was very
detailed. I will add though that the fire lapping kit I used came from
Beartooth Bullets in Idaho and it is very well put together and pretty straight forward to use. If you have a blued gun, the 100 fire lapping bullets should suffice for your project, but if you are like me and had a stainless gun to work with I would get an extra box of 100 more bullets to work with. Stainless is tougher to cut through, for the constrictions I was dealing with it took all 200 I had so keep that in mind. The fire lapping loads I put together used 3 grains of W231 powder which is a good fast burning power for a light load like that, you just want enough power to get the bullet out the muzzle and onto paper down range
so you know it didn't get stuck in the
barrel.
Another thing I will add is that due to this project being done during 2020, COVID and the 'great ammunition shortage,' coming up with the brass to load all 200 rounds at once was not going to happen. I had 50 pieces on hand and that had to do for this project, but honestly if I had to do it again it seemed to work to my advantage only doing 50 rounds at a time. It let me be very thorough in the process of embedding the grit into the lapping rounds rather than hurrying through making all 200 in one sitting and doing a sloppy job. It also helped at the range when you want to be thorough in scrubbing all the lead out of the barrel and cylinder every three cylinder loads full (or 18 rounds between cleanings). If you did all 200 rounds in one trip that is 12 times fully scrubbing out your revolver and that can be tedious if you did it all in one trip.. breaking it up into 4 trips made it less painful if you will. Also Fermin touches on this, but wrapping your bore brush in strips of Chore Boy brand ALL COPPER scrubber pads till the brush is snug in the barrel makes scrubbing the lead out far easier than without it. These were not available locally for some reason but again Amazon had 36 packs so I'm set for life.
So how did firelapping go for me? In the first session I sat down at the range with both my cleaning kit and pin gauges and let rounds fly at the 4 targets I set up downrange. You could actually watch as I went from target to target with each successive 6 rounds the groups got tighter and tighter; which was pretty cool to see. After two series of 18 rounds each and cleaning in between, my .346 pin gauge (that would originally only go in a half inch to the muzzle) slid into the barrel and now stopped right where the barrel threaded into the frame. This is often called 'thread choke,' and if a barrel is torqued into the frame too tightly it can squeeze in on itself and cause a constriction. This spot would be where the next 136 of my lapping rounds and three other trips to the range would be spent cutting through until my .346 pin pushed freely through the entire barrel. Now with good cylinder throats, a lapped barrel and the right ammunition, I was ready to test out the 686 and see if it was worth all the work I just put into it.
I started out at the 25 yard mark with some paper targets and shooting from the bench similar to how I was setup for fire lapping. My lapping rounds got to a point where I was shooting a ragged hole, my new 'correctly' loaded ammunition was no different so that was a good start. Then I decided for fun I would try my luck standing one handed with the last 5 rounds I had. The 686 grouped all 5 in 2.25 inches, I'm sure some of you pisteleros out there can do better but one handed at 25 yards that is pretty good for me! And to add to it, I went home and checked the barrel... no leading! Just had to wipe out the powder fouling and I was good to go. Next trip out to the range it was time to up the ante, I asked the RSO that day if I could take the 686 over to the rifle side of the range. He looked at me funny, and with a snicker said "go for it". On the rifle side, they have an 8" steel plate setup at 139 yards and now I was determined to hit it. After dialing in the sights for the first few cylinders full, I was on target and was able to consecutively hit the steel plate offhand; I couldn't believe it. Already flying high about what this sixgun was now capable of, I overheard that snickering RSO saying to his coworker "that was the best shooting I've ever seen with a handgun" as I was leaving the range. Icing on the cake my friends, I'll take that any day.
Well, I hope this write up has inspired you to take a good look at the revolvers in your own collections and if they aren't up to snuff, maybe considering some of the solutions that have helped me. One of the most important lessons I've learned out of all of this is that the community of sixgunners is a very warm and welcoming group that is more than willing to help each other out. Never feel like a question is too dumb or not worth of asking to each other because only together we will learn and pass those teachings on to the many generations to come.
References:
A Contemporary Look At Barrel Leading and Related Sixgun Issues - By Fermin
Garza
Preventing Barrel Leading in Revolvers Using Cast Bullets - By Grant Cunningham
Jameson Dreyfous

Got something to say about this article?
Want to agree (or disagree) with it? Click the following link to
go to the GUNBlast Feedback Page.
|
|
Click pictures for a larger version.
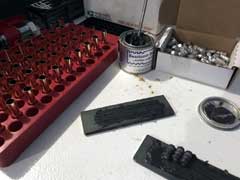
Beartooth Bullets Fire-Lapping
Kit.
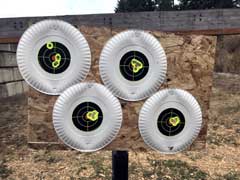
Progressive improvement in accuracy is readily apparent.
After initial fire lapping, the .346 pin gauge stopped
at a secondary constriction at the thread choke.
|